PC HOW TO QUESTIONS

Wednesday, January 03, 2007

How to change SAP script

1. Firstly open SE71. Enter the Form name.

2. Click change


3. Click on Page window


4. You can now change the attributes.

5. Only those highlighted in blue on page window will

enable you to change the attributes

6. To select or highlight, just double click any entries on page window


7. Once you are satisfy with the new changes click on

8. Form > Activate


9. To change the SAP script, click on 'text element'

10. Now go to > goto> change editor for a better view


11. Here you can perform your adap changes.

12. Once you click save, a transport number will be generated.

13. Remember the transport number as subsequent changes will be save

directly to the new transport request

14. Go to SCC1 to import to different client in the same ever

15. Go to STMS to import to different client in different server

16. To test your new program, go to SE93

Labels: , , ,

Deleting user claim or vendor list with OBR2

Enter OBR2 to open deleting master data


If you get the below error this is due to existing data


Open FBL1N to check existing data


If you see this there are data, please reserver the entry

Labels: , , , , ,

Thursday, December 21, 2006

How to troubleshoot authorization issue

1. When user receive an authorization error such as the below dialog box, request the user to enter /nSU56 or /nSU53 to display more details on the authrization issue.


2. In Su56, expend the menu and you will see the object value and transaction type. In this scenario we know user do not have authorization on object value "0111" and transaction "V"


3. We now know that user is not authorized for object "C_PROJ_TCD", value "0111" and type "V".

4. Use T-Code S_BCE_68001425 to search for the authorization object. In this scenario we enter the username and authorization object and it will display the role.


5. Below is the results. Now we have to find the correct role which we need to give authorization too. If you are not sure, consult with your consultant.


6. Open /nPFCG to edit the role.

7. Enter the role name.

8. Click on Authorization tab and click "display authorization data"

9. Expend the menu and locate the object or use the "FIND" button to search for object "C_PROJ_TCD"


10. Below are the authorization you need to provide accordingly.

11. In this case, we select "0111 which is Basic WBS dates"


12. Save

13. Click on generate profile button


14. Now do user comparison


15. Ask user to re-login and try the transaction again.

Addtional Info
If you know the Authorization object and would like to search which transaction is using it, you can open this transaction from SAP menu.

Labels: , , , ,

Thursday, November 23, 2006

Speeding Up Windows

1. Disable Indexing Services
Indexing Services is a program that perform index to your computer. When you do a search for something on your computer, it will search faster by scanning the index lists but this system service is completely unnecessary. To disable do the following:


  • Go to My Computer
  • Right click on C: drive
  • Click Properties
  • Uncheck “Allow Indexing Service to index this disk for fast file searching”
  • Apply to all files and folders
  • If Windows prompt that file is in use, click ignore to all


2. Optimise Display Settings
Windows XP original theme visual items can waste system resources. To optimise:


  • Go to Start
  • Click Settings ( if you can’t find it, go to the next step)
  • Click Control Panel
  • Click System
  • Click Advanced tab
  • In the Performance tab click Settings
  • Then select Adjust for best performance
  • Click Apply and Ok
  • Windows will take 1-3 minutes to implement the new changes.


3. Speedup Folder Browsing
You may have noticed that everytime you open my computer to browse folders that there is a slight delay. This is because Windows XP automatically searches for network files and printers everytime you open Windows Explorer. To fix this and to increase browsing significantly:


  • Open My Computer
  • Click on Tools menu
  • Click on Folder Options
  • Click on the View tab.
  • Uncheck the Automatically search for network folders and printers check box
  • Click Apply
  • Click Ok
  • Reboot your computer


4. Optimise Your Pagefile
If you give your pagefile a fixed size it saves the operating system from needing to resize the page file.


  • Right click on My Computer and select Properties
  • Select the Advanced tab
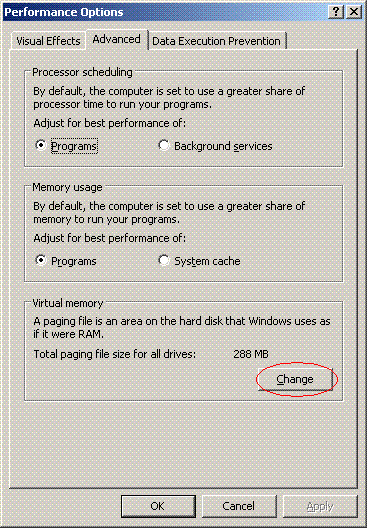
  • Under Performance choose the Settings button
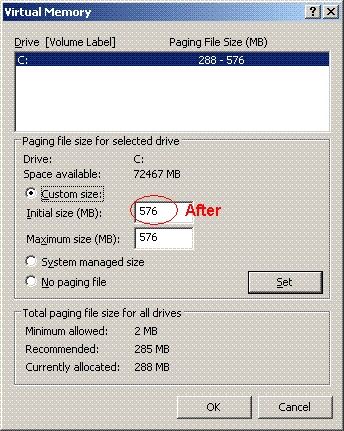
  • Select the Advanced tab again and under Virtual Memory select Change


  • Highlight the drive containing your page file and make the initial Size of the file the same as the Maximum Size of the file.


  • Click ok and restart computer

5. Disable Prefetch on Low Memory Systems
Prefetch is designed to speed up program launching by preloading programs into memory - not a good idea is memory is in short supply, as it can make programs hang. To disable prefetch:

  • Click ‘Start’ then ‘Run’
  • Type in ‘Regedit’ then click ‘Ok’
  • Navigate to 'HKEY_LOCAL_MACHINE\SYSTEM\CurrentControlSet\Control\SessionManager\Memory Management\PrefetchParameters\’
  • Right-click on “EnablePrefetcher” and set the value to ‘0′
  • Reboot.

6. Improve XP Shutdown Speed
This tweak reduces the time XP waits before automatically closing any running programs when you give it the command to shutdown.

  • Go to Start then select Run
  • Type ‘Regedit’ and click ok
  • Find ‘HKEY_CURRENT_USER\Control Panel\Desktop\’Select ‘WaitToKillAppTimeout’
    Right click and select ‘Modify’
  • Change the value to ‘1000′
  • Click ‘OK’
  • Now select ‘HungAppTimeout’
  • Right click and select ‘Modify’
  • Change the value to ‘1000′
  • Click ‘OK’
  • Now find ‘HKEY_USERS\.DEFAULT\Control Panel\Desktop’
  • Select ‘WaitToKillAppTimeout’
  • Right click and select ‘Modify’
  • Change the value to ‘1000′
  • Click ‘OK’
  • Now find ‘HKEY_LOCAL_MACHINE\System\CurrentControlSet\Control\’
  • Select ‘WaitToKillServiceTimeout’
  • Right click and select ‘Modify’
  • Change the value to ‘1000′
  • Click ‘OK’

7. Make Your Menus Load Faster
This is one of my favourite tweaks as it makes a huge difference to how fast your machine will ‘feel’. What this tweak does is remove the slight delay between clicking on a menu and XP displaying the menu.

  • Go to Start then Run
  • Type ‘Regedit’ then click ‘Ok’
  • Find “HKEY_CURRENT_USER\Control Panel\Desktop\”
  • Select “MenuShowDelay”
  • Right click and select “Modify’
  • Reduce the number to around “100″

8. Speedup Folder Access - Disable Last Access Update
If you have a lot of folders and subdirectories on your computer, when you access a directory XP wastes a lot of time updating the time stamp showing the last access time for that directory and for ALL sub directories. To stop XP doing this you need to edit the registry. If you are uncomfortable doing this then please do not attempt.

  • Go to Start and then Run and type “regedit”
  • Click through the file system until you get to
  • HKEY_LOCAL_MACHINE\System\CurrentControlSet\Control\FileSystem”
  • Right-click in a blank area of the window on the right and select ‘DWORD Value’
  • Create a new DWORD Value called ‘NtfsDisableLastAccessUpdate’
  • Then Right click on the new value and select ‘Modify’
  • Change the Value Data to ‘1′
  • Click ‘OK’

Labels: , , ,

Saturday, November 18, 2006

BSOD each time you boot windows?

Symptoms:
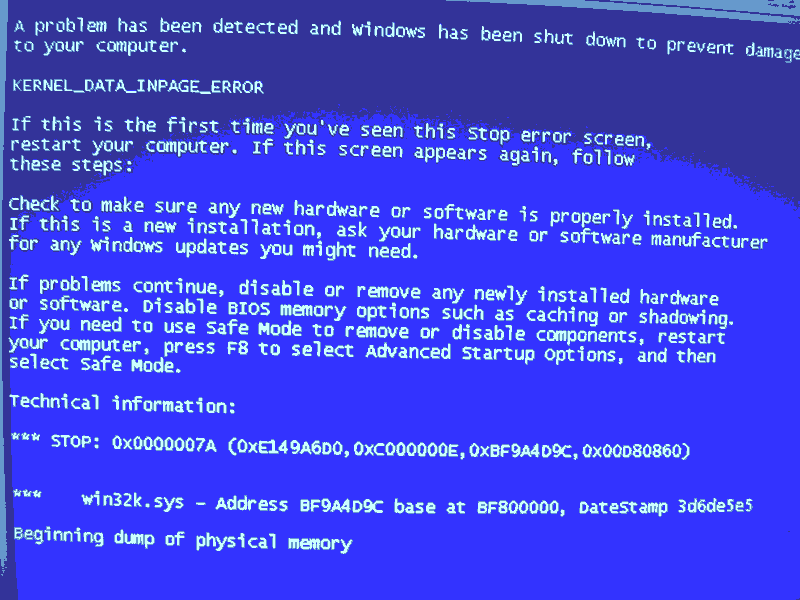
1. Machine show Blue screen of death (BSOD) each time Windows Start
2. Failed to boot in Safe Mode because BSOD appears as well.
3. You start to panic.


Solution:
1. Reboot machine and enable CD Boot
2. Insert Windows installation disk
3. Boot from CD Rom
4. Press R to repair a windows installation
5. In the recovery console, perform "CHKDSK"
6. Restart machine.

* If Windows still fail to boot up, try reformat machine.
* It might also be caused by faulty hardware or application.

Labels: , , , ,

Replace RAM for Fujitsu Lifebook P5000


1. Shutdown the Laptop.
2. Remove the battery
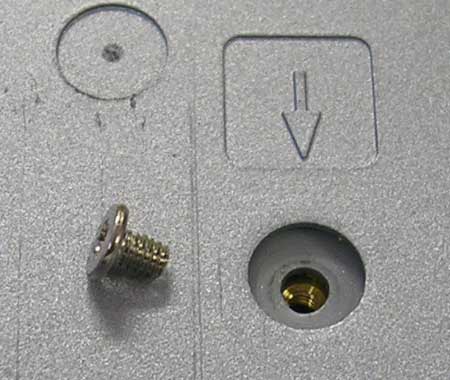
3. You will see 3 small screw with arrows as indication.
4. Removes these screw.


5. Now turn the laptop over
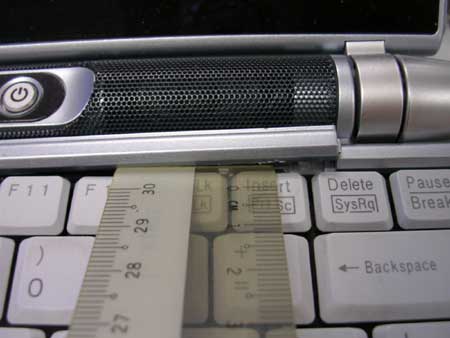
6. Gently use a ruler and lift up this plastic piece


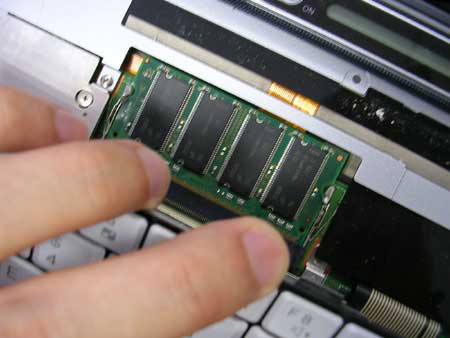
7. Once plastic piece remove, you can gently lift up the keyboard
8. You can then change the RAM.

Labels: , , , , , ,

Wednesday, October 25, 2006

Backup database to a tape drive using DB13

In this scenario, we will backup the Database (DB2) to a tape drive and then perform archive once backup is completed.


1. Enter T-Code DB13 into the command field.
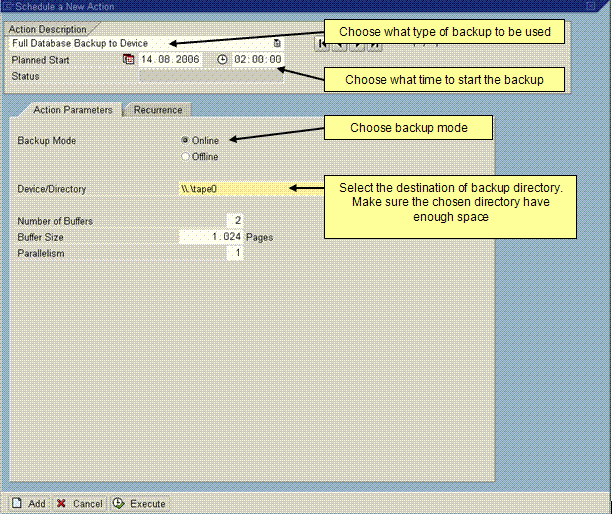
2. Choose at what date and what time to perform the backup. Click the ADD button.
3. You will see the above screen.

4. Fill in the details of the backup to be performed.
Action: Full Database Backup to Device
Backup Mode: Online
Device/ Directory: file:////tape0

5. Click Add
6. Now enter the backup tape into the tape drive.

In this case, full backup job has been schedule and will be perform at 2:00AM. Once completed, you will have to perform archive inactive Log Files to Tape. To do so, please follow:-

*Please take note that each archive command is different. Since I am using DB2, I'll use the IBM D2 command line utility


1. Eject Insert the correct tape cartridge for the day into the tape drive.

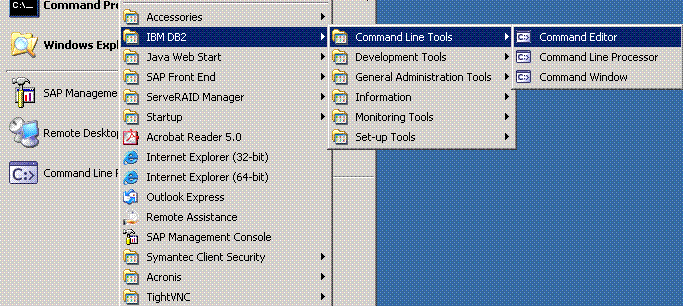
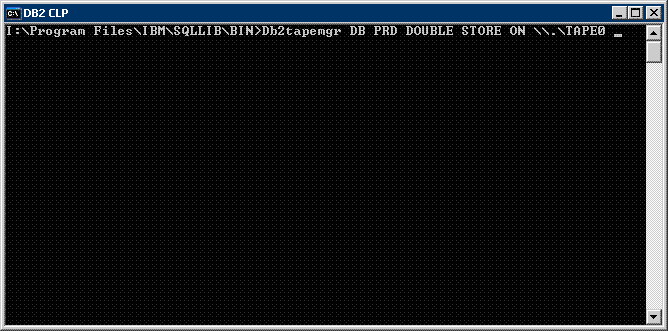
2. Go to Start > All Programs > IBM DB2 > Command Line Tools > Command Window


3.You will see the above command window
4. Enter db2tapemgr DB PRD DOUBLE STORE on \\.\TAPE0 FORCE
5. It would take a while until archive backup log is complete.
6. Once completed, you can eject the tape using db2tapemgr EJECT TAPE \\.\TAPE0 on the command window.
You have succesfully perform backup and archive log to a tape.

Labels: , , , ,