Speeding Up Windows
1. Disable Indexing Services
Indexing Services is a program that perform index to your computer. When you do a search for something on your computer, it will search faster by scanning the index lists but this system service is completely unnecessary. To disable do the following:
- Go to My Computer
- Right click on C: drive
- Click Properties
- Uncheck “Allow Indexing Service to index this disk for fast file searching”
- Apply to all files and folders
- If Windows prompt that file is in use, click ignore to all
2. Optimise Display Settings
Windows XP original theme visual items can waste system resources. To optimise:
- Go to Start
- Click Settings ( if you can’t find it, go to the next step)
- Click Control Panel
- Click System
- Click Advanced tab
- In the Performance tab click Settings
- Then select Adjust for best performance
- Click Apply and Ok
- Windows will take 1-3 minutes to implement the new changes.
3. Speedup Folder Browsing
You may have noticed that everytime you open my computer to browse folders that there is a slight delay. This is because Windows XP automatically searches for network files and printers everytime you open Windows Explorer. To fix this and to increase browsing significantly:
- Open My Computer
- Click on Tools menu
- Click on Folder Options
- Click on the View tab.
- Uncheck the Automatically search for network folders and printers check box
- Click Apply
- Click Ok
- Reboot your computer
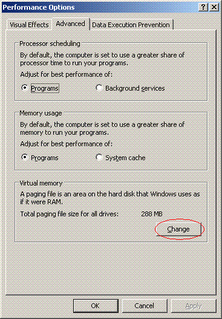
4. Optimise Your Pagefile
If you give your pagefile a fixed size it saves the operating system from needing to resize the page file.
- Right click on My Computer and select Properties
- Select the Advanced tab
- Under Performance choose the Settings button
- Select the Advanced tab again and under Virtual Memory select Change

- Highlight the drive containing your page file and make the initial Size of the file the same as the Maximum Size of the file.
- Click ok and restart computer

5. Disable Prefetch on Low Memory Systems
Prefetch is designed to speed up program launching by preloading programs into memory - not a good idea is memory is in short supply, as it can make programs hang. To disable prefetch:
- Click ‘Start’ then ‘Run’
- Type in ‘Regedit’ then click ‘Ok’
- Navigate to 'HKEY_LOCAL_MACHINE\SYSTEM\CurrentControlSet\Control\SessionManager\Memory Management\PrefetchParameters\’
- Right-click on “EnablePrefetcher” and set the value to ‘0′
- Reboot.
6. Improve XP Shutdown Speed
This tweak reduces the time XP waits before automatically closing any running programs when you give it the command to shutdown.
- Go to Start then select Run
- Type ‘Regedit’ and click ok
- Find ‘HKEY_CURRENT_USER\Control Panel\Desktop\’Select ‘WaitToKillAppTimeout’
Right click and select ‘Modify’ - Change the value to ‘1000′
- Click ‘OK’
- Now select ‘HungAppTimeout’
- Right click and select ‘Modify’
- Change the value to ‘1000′
- Click ‘OK’
- Now find ‘HKEY_USERS\.DEFAULT\Control Panel\Desktop’
- Select ‘WaitToKillAppTimeout’
- Right click and select ‘Modify’
- Change the value to ‘1000′
- Click ‘OK’
- Now find ‘HKEY_LOCAL_MACHINE\System\CurrentControlSet\Control\’
- Select ‘WaitToKillServiceTimeout’
- Right click and select ‘Modify’
- Change the value to ‘1000′
- Click ‘OK’
7. Make Your Menus Load Faster
This is one of my favourite tweaks as it makes a huge difference to how fast your machine will ‘feel’. What this tweak does is remove the slight delay between clicking on a menu and XP displaying the menu.
- Go to Start then Run
- Type ‘Regedit’ then click ‘Ok’
- Find “HKEY_CURRENT_USER\Control Panel\Desktop\”
- Select “MenuShowDelay”
- Right click and select “Modify’
- Reduce the number to around “100″
8. Speedup Folder Access - Disable Last Access Update
If you have a lot of folders and subdirectories on your computer, when you access a directory XP wastes a lot of time updating the time stamp showing the last access time for that directory and for ALL sub directories. To stop XP doing this you need to edit the registry. If you are uncomfortable doing this then please do not attempt.
- Go to Start and then Run and type “regedit”
- Click through the file system until you get to
- HKEY_LOCAL_MACHINE\System\CurrentControlSet\Control\FileSystem”
- Right-click in a blank area of the window on the right and select ‘DWORD Value’
- Create a new DWORD Value called ‘NtfsDisableLastAccessUpdate’
- Then Right click on the new value and select ‘Modify’
- Change the Value Data to ‘1′
- Click ‘OK’

0 Comments:
Post a Comment
Subscribe to Post Comments [Atom]
<< Home